0

Baking Bites for Craftsy: All-Purpose Vanilla Cupcakes

Baking Bites for Craftsy: All-Purpose Vanilla Cupcakes

By Nicole

Baking Bites for Craftsy: All-Purpose Vanilla Cupcakes

Vanilla cupcakes are one of my favorite go-to recipes. They’re easy to make and they appeal to just about everyone. They can be topped off with any flavor of frosting – which means that it isn’t difficult to get chocolate-lovers to go for them – and they can even be eaten completely plain by those who don’t have much of a sweet tooth. There are lots of good vanilla cupcake recipes to choose from, but the Easy Vanilla Cupcake Recipe that I’m sharing over on the Craftsy blog (it’s free!) is a great one to start with. The recipe takes less than 30 minutes from start to finish and produces cupcakes that are fluffy and flavorful every time.

I’m partial to vanilla cupcakes with vanilla frosting, so I recommend topping these off with Vanilla Frosting, but a creamy Chocolate Frosting is a good choice, too. If you are keeping the frosting simple, I recommend finishing a batch off with a few of colorful sprinkles to make your cupcakes pop!

Source: Baking Bites


Read More
0

Bacon & Spinach Stovetop Breakfast Casserole

Bacon & Spinach Stovetop Breakfast Casserole

By Nicole

Bacon & Spinach Stovetop Breakfast Casserole

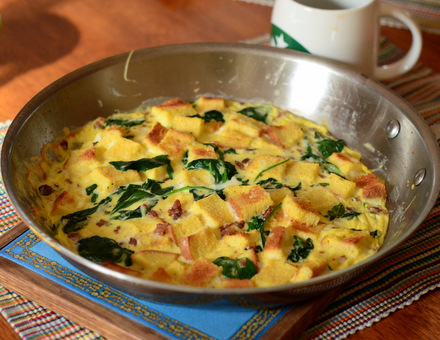
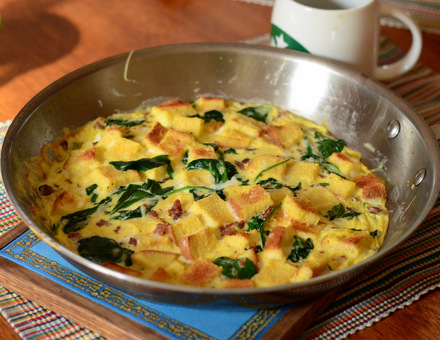
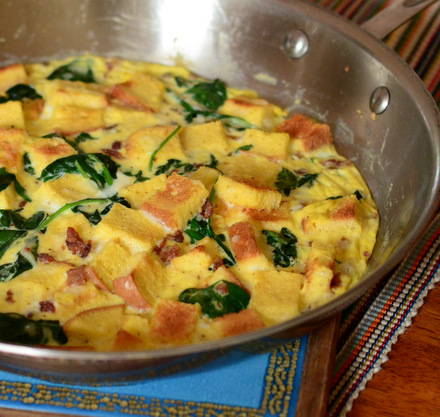
When I think of a casserole, I picture a large dish that consists of layers of different ingredients that is baked in the oven. For breakfast, this usually means a dish that uses plenty of eggs and cheese, ideal for serving to a crowd and not tying you to the stove to make dozens of fried eggs for brunch. But baking dishes come in all shapes and sizes and you can scale down those recipes for easy, low maintenance recipes that will feed just two or four people. This Bacon & Spinach Stovetop Breakfast Casserole is an excellent example of a non-traditional casserole that is easy to make, delicious and a thoroughly satisfying breakfast for two.

This casserole is a bit like a savory bread pudding, as it combines cubes of toasted bread with eggs and other ingredients. I first heard about this style of casserole in an issue of Cook’s Country magazine and was surprised by the addition of bread, but it makes the dish heartier (without simply loading it up with more meat or cheese) and brings in a lighter texture that really works well with the other ingredients.

Start by sauteeing chopped up bacon in a skillet that is oven-safe. An 8-inch or 10-inch skillet is ideal, however you can use a 12-inch skillet, as well. The bacon should be cooked until crisp, then it can be removed from the pan and set aside. Add in your spinach and onions and sautee them in the bacon fat (feel free to drain off the excess, if you have more than 1-2 tbsp in the pan) before adding the bacon back to the pan, along with eggs and toasted bread. The casserole is finished in the oven to ensure that it bakes up to be tender and creamy, not as firm as a frittata.

The whole dish takes about 15 minutes to make and part of that time is hands-off. It’s a delicious change of pace from my usual weekend breakfast options and I love the texture that the toasted bread adds to the dish. This will very comfortably serve two or three, but can easily be served to four if you are serving some potatoes or fruit alongside of it.
Bacon & Spinach Stovetop Breakfast Casserole

Bacon & Spinach Stovetop Breakfast Casserole
2 large slices white bread
3 slices bacon, coarsely chopped (about 3-4 tbsp chopped bacon)
3 tbsp diced onion
4-6 oz baby spinach
4 large eggs
6 tbsp milk
salt and pepper, to taste
1/2 cup shredded fontina cheese

Preheat oven to 475F.
Toast the bread in a toaster until golden brown. Set aside to cool, then cut into 1/2-inch cubes.
In an 8 or 10-inch oven-safe skillet, saute bacon over medium heat until crisp, about 3-4 minutes. Using a slotted spoon, remove bacon from the pan and set aside to drain. Leave bacon fat in pan and add in onion and spinach. Saute until the onion is translucent and the spinach is wilted, about 3-4 minutes.
In a medium bowl, whisk together eggs, milk, salt and pepper. Add the cheese, spinach mixture and the bacon in with the eggs and stir to combine, then return the mixture to the pan. Cook for about 45-60 seconds, just until the eggs begin to set at the edge, then add in the bread and fold to combine with the eggs and evenly distribute the bread cubes.
Transfer pan to oven and bake for 6-8 minutes, until just set.
Serve immediately.

Serves 2-3

Source: Baking Bites


Read More
0

Cook’s Illustrated Tests Belgian-Style Waffle Irons

Cook’s Illustrated Tests Belgian-Style Waffle Irons

By Nicole

Cook's Illustrated Tests Belgian-Style Waffle Irons

Crispy Belgian waffles with deep, syrup-catching pockets and fluffy interiors are a breakfast treat that many of us don’t get to eat nearly as often as we would like to. Belgian waffles require a special type of waffle iron that will produce the correct waffle shape, as well as a great waffle batter recipe that will give the waffles just the right consistency. Fortunately, there are many Belgian waffle irons out there to choose from, if you want to make your own at home, and the Cook’s Illustrated test kitchen helpfully set out to see which models were worth buying in a recent (Jan/Feb 2016) issue.

The testers required that the waffles be at least 1-inch high and that the irons produce uniformly browned waffles every time that they were used. They found that some irons simply couldn’t get hot enough to produce a crisp finish every time, while others had hot spots that led to burning. They also looked for models that had a timer which allowed you to know when the waffle was done without opening the machine to check it repeatedly, and preferred if that waffle was done in under 5 minutes. As they always do, the testers also looked for ease of use and cleanup on each of the 13 models that they tested. At the end of the day, only 3 models made it through the testing with solid “Recommended” ratings.

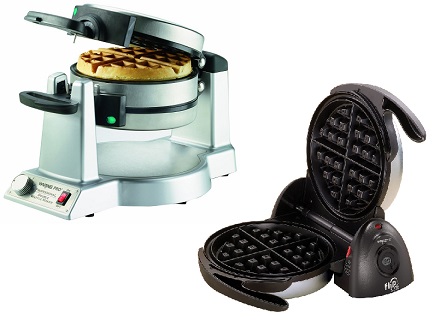
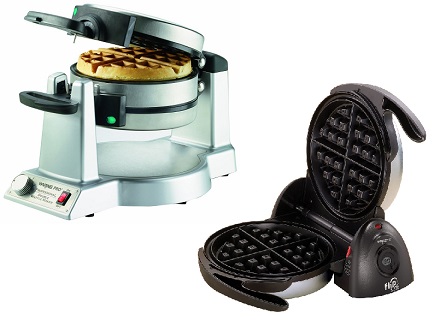
The winner was the Waring Pro Double Belgian Waffle Maker by Conair, which not only produced perfect waffles, but was able to make them two at a time. At less than $100, this machine offered a solid value and performance for waffle lovers, but it is fairly bulky and will take up quite a bit of storage space when not in use. The “Best Buy” award went to the Presto FlipSide Belgian Waffle Maker, which was half the price of the winner, but only made a single waffle at a time and wasn’t quite as easy to use as the winner, though it was much smaller. The final recommendation went to another Waring Pro Waffle Maker, a single-waffle model that performed well and didn’t take up quite as much room as its larger counterpart.

Source: Baking Bites
    

Read More
0

Cinnamon Bun Oreos, reviewed

Cinnamon Bun Oreos, reviewed

By Nicole

Cinnamon Bun Oreos, reviewed

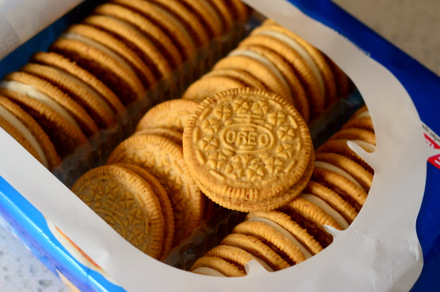
I like cinnamon buns and cinnamon-bun related goodies, such as donuts topped with cinnamon sugar and yeasted coffee cakes with a cinnamon streusel topping. Who doesn’t? Naturally, I had to pick up a container of the new Cinnamon Bun Oreos after I heard that they were being released as a new cookie flavor this month. The sandwiches are made with cinnamon cookies and are filled with a cinnamon bun-flavored creme filling.

You can smell the cinnamon as soon as you open the package. The cookies look similar to golden Oreos, but are flecked with darker bits of cinnamon that hint at that flavor. They are crisp and have a nice balance of both vanilla and cinnamon notes. The creme filling also has an element of cinnamon to it, along with a touch of creamy vanilla and sugar. The combination is reminiscent of a cinnamon bun, but a cinnamon bun that uses a classic confectioners’ sugar glaze, rather than a cream cheese frosting. They’re delicious with coffee – much like regular cinnamon buns are.

Cinnamon Bun Oreos, reviewed

While I think that these would also be good with a creme cheese filling, the reason that these cookies are so tasty is the crispy cookie part of the sandwich. Adding cinnamon to the cookies really pops those warm spice flavors and sets this cookie apart from other flavors Oreos and other cinnamon cookies. I should also note that the cinnamon flavor is so well designed that these cookies (unlike some other special edition Oreos) don’t feel like a gimmick instead of a well-designed new cookie. Try incorporating some of these cookies into your next batch of cookies n’ cream ice cream or into any other cookies n’ cream treat for a spiced up treat

Source: Baking Bites


Read More
0

Cinnamon-Sugar Knots

Cinnamon-Sugar Knots

By Nicole

Cinnamon Sugar Knots

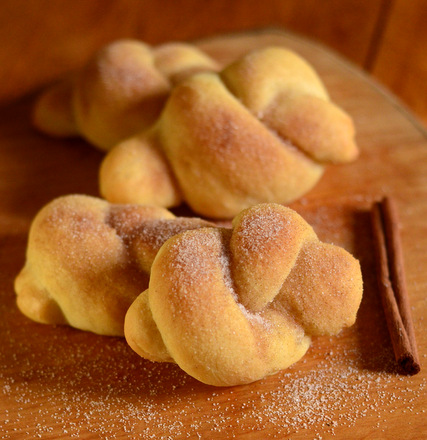
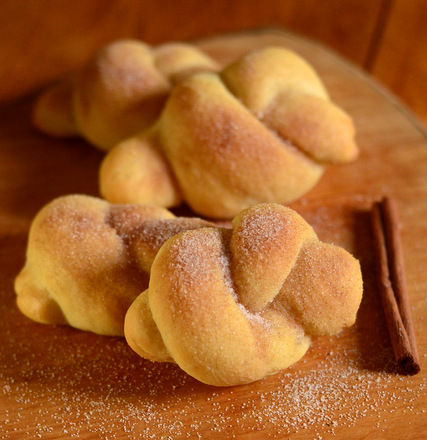
I just might be addicted to these easy-to-make Cinnamon Sugar Knots. The bread knots start out with homemade pizza dough, which is generously doused with butter and sprinkled with cinnamon-sugar before serving. You can find similar rolls served at some pizzerias, as it is a great way to use up leftover dough, but you can’t beat a homemade batch that is fresh from the oven.

The dough for this bread is easy to put together and can be made either in a stand mixer or by hand. The dough has a hint of cinnamon and sugar in it, but is a relatively plain dough and makes a great base for the buttery topping. The dough should be allowed to rise, then you can roll it out into thin ropes and twist them to form palm-sized knots. The knot shape is not only attractive to look at, but it traps the topping of butter and sugar that is added to the rolls before serving. The fluffy finished knots are taste a bit like churros or sugar-topped donuts, but require no frying.

If you find that you are pressed for time, you can make these knots with pre-made pizza dough. To use it, simply let the dough come to room temperature and then cut it up and roll it out to form the knots. You might get slightly more or less than my recipe will produce, depending on the size of the dough you are using. While I did add a bit of cinnamon to my dough, it isn’t necessary to get good results from these, so don’t worry about it if you’re opting for premade dough.

Serve these warm from the oven and eat them as-is, or with a side of cream cheese frosting.


Cinnamon Sugar Knots
3/4 cup water, warm (100-110F)
2 1/2 tsp (1 envelope) active dry yeast
1 tbsp sugar
2 cups all purpose flour
2 tbsp vegetable oil
1/2 tsp ground cinnamon
3/4 tsp salt

Topping
1/4 cup butter, melted and cooled
1/2 cup sugar + 1 1/2 tsp ground cinnamon

In a small bowl, combine 1/4 cup of the water with the yeast and sugar. Stir and allow to stand for 5 minutes, until mixture is foamy.
In the bowl of a stand mixer, combine yeast mixture with remaining water, flour, vegetable oil and cinnamon. Mix with a paddle attachment until dough comes together and begins to pull away from the sides of the pan. If the dough seems extremely wet, add in an additional tablespoon of flour. Turn mixer up to medium and beat for 1-2 minutes. (This can be done by hand with a wooden spoon and a little bit of elbow grease).
Transfer the dough to a lightly oiled bowl and cover with plastic wrap. Let rise for 60 minutes, or until doubled in size.
Preheat oven to 375F.
On a lightly floured surface, gently deflate the dough. Cut into 8 even pieces and roll each out into a log about 12-inches long. Divide each of the long logs in half using a knife and twist each (make a loop and pull the ends through) into a knot.
Arrange knots on a parchment-lined baking sheet.
Brush knots with a small amount of melted butter and allow to rise for 15-20 minutes, until slightly risen.
Bake for 18-20 minutes, or until lightly browned.
As soon as you take the knots out of the oven, brush them with the remaining melted butter and generously sprinkle them with the cinnamon-sugar mixture. Serve warm.

Makes 16.

Source: Baking Bites


Read More

Calendar

December 2024
M T W T F S S
« Jan    
 1
2345678
9101112131415
16171819202122
23242526272829
3031